


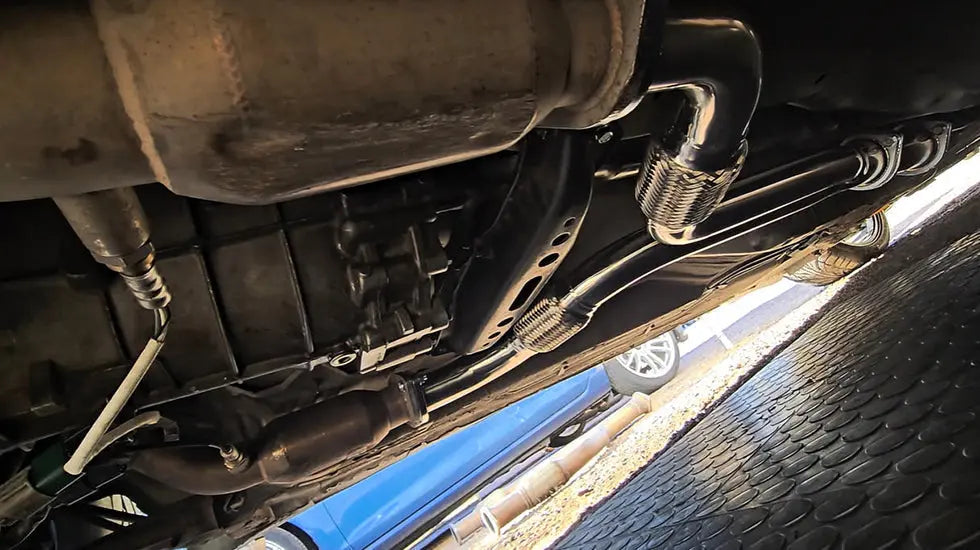
A downpipe is the exhaust section that carries gases away from the turbocharger and toward the rest of the exhaust system. If it is cracked, leaking, restricted, damaged by corrosion, or being replaced as part of a compatible performance build, the job involves more than removing a few bolts. Fitment, sensor routing, sealing surfaces, exhaust alignment, emissions equipment, and calibration all matter.
- Where a downpipe is located and what it connects to
- Common signs of a damaged downpipe
- Tools, safety checks, and a practical replacement sequence
- How to choose a replacement downpipe without guessing on fitment
- When a professional installation is the safer choice

What Is a Downpipe and Where Does It Connect?
On a turbocharged vehicle, the downpipe normally connects to the turbocharger outlet and routes exhaust gases toward the catalytic converter, front pipe, mid-pipe, or another downstream exhaust section. The exact layout depends on the vehicle platform and emissions configuration.
That location matters because a downpipe sits in a high-heat area and may be close to oxygen sensors, heat shields, wiring, steering components, the firewall, and the transmission tunnel. Two parts can look similar in a product photo but use different flanges, sensor locations, outlet positions, or catalytic-converter arrangements.
Some owners use “downpipe” as a broad term for the first exhaust section after the engine. In practice, a downpipe, test pipe, front pipe, and mid-pipe are not always the same part. Check the connection points and the vehicle-specific fitment details before ordering.
If you are comparing available options, browse the Flashark downpipe collection after matching the part to your vehicle’s year, engine, turbo configuration, emissions equipment, and exhaust connections.
Signs That a Downpipe May Need Replacement
A damaged downpipe does not always create one obvious symptom. Exhaust leaks and fitment problems can sound similar to issues elsewhere in the exhaust system, so inspect the complete path before replacing parts.
- Exhaust smell near the engine bay: A leak near the turbo outlet or downpipe flange can allow exhaust gases to escape before they reach the rest of the system.
- Ticking, rattling, or metallic noise: Cracked pipe sections, loose heat shields, worn clamps, or loose fasteners can create noise that changes with engine speed.
- Visible soot around a joint: Black soot near a flange, clamp, sensor bung, or flex section can point to an exhaust leak.
- Damaged hardware or corrosion: Rusted fasteners, distorted flanges, broken studs, or a damaged flex section can make removal more difficult and affect sealing.
- Warning lights after exhaust work: Sensor location, wiring condition, exhaust leaks, emissions equipment, and calibration can all affect warning-light behavior.
DIY Downpipe Replacement: Is It the Right Job for You?
Downpipe replacement can be a reasonable DIY project on an accessible platform with confirmed parts, adequate tools, and safe lifting equipment. It becomes more difficult when the turbo outlet is difficult to reach, the hardware is heavily corroded, sensor wiring is fragile, or the new part requires adjustments to the surrounding exhaust system.
When DIY Can Make Sense
- You have confirmed the exact replacement part and connection style.
- You can safely support the vehicle on level ground.
- You have access to the correct sockets, extensions, sensor tools, and torque information for the vehicle.
- You can inspect the full exhaust path before tightening the final connections.
When Professional Installation Is a Better Choice
- The vehicle has limited access around the turbocharger or downpipe.
- Fasteners, studs, or sensor threads are severely corroded.
- The installation involves emissions-related hardware or requires diagnosis of an existing warning light.
- The new exhaust section does not align naturally with the downstream exhaust.
- You are unsure whether the vehicle needs additional calibration work after the hardware change.
Honestly, this is where many installs go wrong: a system is tightened before it is aligned. An exhaust section installed under tension can shift as it heats and cools, causing a leak, a rattle, or contact with nearby components.
Tools and Materials for Downpipe Replacement
The exact tool list varies by vehicle, but the following items are commonly needed for a downpipe installation or replacement:
- Vehicle-specific service information and torque specifications
- Socket set, ratchet, extensions, and appropriate wrenches
- Penetrating lubricant for corroded hardware
- Torque wrench
- Oxygen-sensor socket or sensor removal tool, where applicable
- Jack and correctly rated jack stands or a vehicle lift
- New gaskets, sealing rings, clamps, or hardware where required by the selected application
- Work light, gloves, eye protection, and heat-resistant handling precautions
Do not assume a replacement part includes every gasket, clamp, fastener, or sensor-related component needed for your vehicle. Check the selected configuration before beginning the job.
Downpipe Replacement Steps
The sequence below is a general process, not a substitute for the repair procedure and torque specifications for your exact vehicle.
1. Prepare the Vehicle and Work Area
- Park on a level surface and let the engine and exhaust cool completely.
- Disconnect the battery if the vehicle-specific repair procedure requires it.
- Raise and support the vehicle using safe lifting points. Never work under a vehicle supported only by a jack.
- Inspect the replacement downpipe, gaskets, flanges, sensor ports, and downstream connection before removing the original part.
2. Inspect Sensor Routing and Surrounding Components
Before removing anything, identify oxygen sensors, wiring clips, heat shields, brackets, and nearby hoses. Mark sensor locations if the vehicle uses more than one sensor or if connectors can be confused during reassembly. Do not pull on a sensor wire to remove the sensor.
3. Remove the Existing Downpipe
- Apply penetrating lubricant to accessible fasteners when appropriate and allow time for it to work.
- Remove heat shields, brackets, sensors, clamps, and fasteners as required by the vehicle.
- Support the downpipe before removing the final connection so it cannot pull on adjacent components.
- Inspect the turbo outlet, mating flanges, studs, gasket surfaces, and downstream exhaust connection after removal.
4. Test-Fit the Replacement Before Final Tightening
Place the replacement downpipe into position and check that the turbo-side connection, sensor ports, brackets, and downstream exhaust connection all line up without forcing the system. Take a minute before tightening that clamp. Clearance should be checked around heat shields, body panels, wiring, steering components, and the transmission area.
5. Install, Align, and Torque the System
- Install new sealing components when required for the selected vehicle and connection type.
- Start fasteners by hand to avoid cross-threading.
- Reconnect sensors and route wiring away from heat and moving components.
- Align the complete exhaust path before applying final torque.
- Tighten fasteners to the vehicle manufacturer’s specifications and in the specified sequence.
6. Check for Leaks and Contact
After reassembly, start the engine and listen for leaks near the turbo outlet, sensor ports, flange joints, and downstream connection. Check for rattles and make sure the exhaust does not touch the body, crossmember, heat shields, or wiring as the system warms up. If a warning light appears after installation, do not assume the new part is the only cause. Inspect for leaks, sensor connection problems, damaged wiring, and configuration-related issues.
Common Downpipe Installation Mistakes
| Mistake | Why It Matters | Better Approach |
|---|---|---|
| Tightening every connection immediately | The exhaust can be installed under tension and move after heat cycling. | Loosely assemble, align the full path, check clearance, then apply final torque. |
| Reusing damaged sealing parts | A distorted gasket, clamp, or flange can cause a persistent leak. | Inspect sealing surfaces and use the correct parts for the selected connection. |
| Forcing sensor wiring into a new position | Heat, tension, or contact can damage wiring or connectors. | Route wiring with adequate heat and movement clearance before final assembly. |
| Assuming similar-looking parts are interchangeable | Flange shape, sensor placement, outlet angle, and emissions layout can differ. | Match the part to the vehicle year, engine, turbo, emissions equipment, and exhaust connection. |
Replacement Downpipe vs. Performance Downpipe
A replacement downpipe is often selected to restore a damaged or leaking factory-style exhaust section. A performance-oriented downpipe may use a different internal layout, catalyst arrangement, pipe diameter, or outlet configuration. Those changes can affect exhaust flow, sound, sensor behavior, tuning requirements, and emissions-related compliance.
A larger pipe is not automatically the right pipe. The final result depends on the complete system: turbocharger, engine condition, exhaust layout, catalyst configuration, intake hardware, calibration, and the quality of the installation. Without vehicle-specific test data, no fixed horsepower, torque, fuel-economy, warning-light, or road-legality result should be assumed.
Review local emissions and road-use requirements before modifying emissions-related equipment. Tune requirements vary by vehicle and installed hardware. Sensor location, exhaust leaks, wiring condition, emissions equipment, and calibration can all affect warning-light behavior.
How to Choose the Right Downpipe
Fitment matters more than a marketing number. Use this checklist before ordering a replacement or upgrade:
- Vehicle identity: Match the year, make, model, engine, and turbo configuration.
- Exhaust layout: Compare turbo-side flange, outlet style, downstream connection, and bracket locations.
- Emissions equipment: Identify the existing catalyst configuration and sensor locations.
- Sensor provisions: Check sensor-port count, thread type, and wire-routing clearance.
- Drivetrain and chassis details: Drivetrain, transmission, body style, and steering layout can affect clearance on some platforms.
- Supporting modifications: Consider the intake, exhaust, calibration, and other installed hardware as one system.
For compatible options, use the Downpipe Exhaust collection and select the configuration that matches the vehicle before ordering.
When a Downpipe Problem Is Not Actually the Downpipe
Exhaust noise, reduced response, fuel-economy changes, or a warning light can have several causes. A loose heat shield, damaged flex section, intake leak, sensor problem, exhaust leak farther downstream, ignition issue, or calibration problem can produce overlapping symptoms.
Start with a visual inspection of the full exhaust path and surrounding components. If the problem began after exhaust work, inspect the joints, sensor connectors, wire routing, and clearance before replacing more parts.
Frequently Asked Questions
Where is the downpipe on a car?
On a turbocharged vehicle, the downpipe is usually the exhaust section connected directly to the turbocharger outlet. It routes exhaust gases toward the catalytic converter or the next section of the exhaust system. Its exact location varies by platform.
Do all cars have a downpipe?
No. “Downpipe” is most commonly used for the exhaust section after a turbocharger. Naturally aspirated vehicles use different exhaust layouts and may instead have exhaust manifolds, headers, front pipes, catalytic converters, Y-pipes, or mid-pipes.
Can I replace a downpipe myself?
It depends on access, corrosion, tools, confirmed fitment, and your ability to safely support the vehicle. Professional installation is often the better choice when the turbo area is difficult to access, sensor wiring is at risk, or the exhaust system needs diagnosis after installation.
Will a replacement downpipe require a tune?
Tune requirements vary by vehicle and installed hardware. A factory-style replacement and a performance-oriented configuration can have different effects on sensors, emissions equipment, and calibration. Consider the complete vehicle setup before making changes.
Can a downpipe cause a warning light?
Warning-light behavior can be affected by sensor location, exhaust leaks, wiring condition, emissions equipment, calibration, and the installed hardware. Reconnecting a sensor alone does not guarantee that no warning light will appear.
What should I check before tightening the downpipe?
Check flange alignment, gasket placement, sensor routing, bracket position, downstream exhaust alignment, and clearance from heat shields, body panels, steering components, wiring, and the transmission area. The system should not be forced into position.

Steven Chen
Automotive Performance Specialist | Engine & Exhaust Systems
Steven focuses on practical engine performance, exhaust fitment, and real-world upgrade paths for classic and modern enthusiast vehicles. He reviews small-block Ford, LS, truck, and street/strip applications with one goal in mind: helping builders choose parts that actually work together. His philosophy: "Good power starts with the right combination, not the biggest part."














