


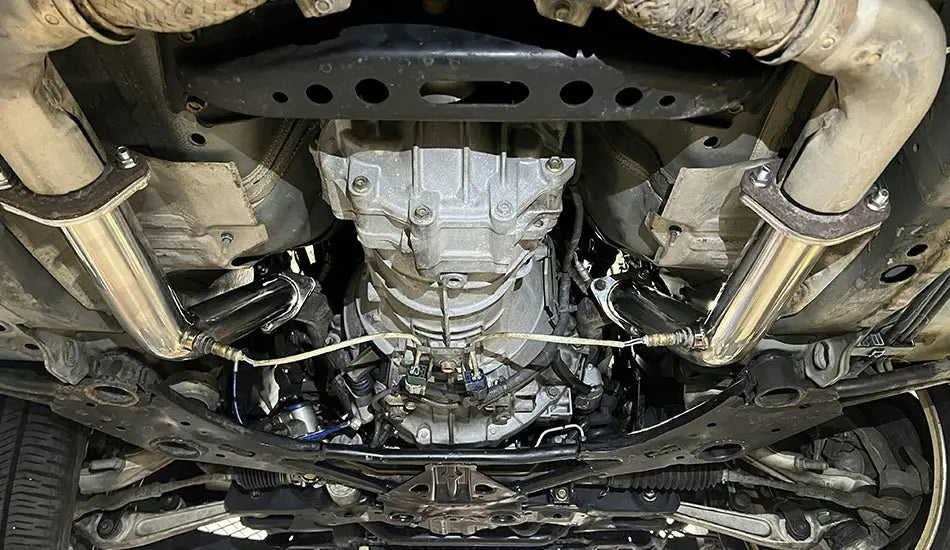
Installing test pipes on a Nissan 350Z means replacing the factory catalytic converters with straight-through sections of exhaust tubing. On a 350Z, the job is most relevant to owners working with the VQ35 engine platform, but the correct part and installation details depend on the vehicle year, engine, exhaust configuration, and the exact product selected.
This guide explains the installation process, the parts and tools to prepare, and the checks that matter before starting. It also clarifies a common point of confusion: on a naturally aspirated 350Z, test pipes replace the catalytic converters. They are not the same component as a turbocharged vehicle's downpipe, and they do not replace the Y-pipe.
- Confirm the selected part matches your Nissan 350Z year, engine, and existing exhaust before ordering.
- Test pipes replace the factory catalytic converters; the Y-pipe is a separate downstream component.
- Rust, seized hardware, oxygen-sensor condition, and exhaust alignment are usually the biggest installation variables.
- Warning-light behavior can be affected by sensor location, exhaust leaks, wiring condition, emissions equipment, and calibration.
- Review local emissions and road-use requirements before modifying emissions-related equipment.
What Are Test Pipes on a Nissan 350Z?
On a Nissan 350Z, test pipes are straight-through exhaust sections installed in place of the original catalytic converters. The factory converters sit between the exhaust manifolds or headers and the rest of the exhaust system. Replacing them changes the path exhaust gases take before reaching the Y-pipe and cat-back system.
Owners often research 350Z test pipes for a louder exhaust note, a different exhaust character, or to reduce restriction compared with a factory catalytic converter. The final result varies with the condition of the engine, headers or manifolds, Y-pipe, cat-back system, exhaust sealing, and calibration. A change in sound should not be treated as proof of a fixed horsepower gain.

| Component | Where It Sits | What It Does | Important Distinction |
|---|---|---|---|
| Factory catalytic converter | Between the engine-side exhaust and the downstream exhaust | Part of the emissions-control system | This is the component test pipes replace. |
| Test pipe | In the catalytic-converter location | Provides a straight-through exhaust section | Fitment, sensor provisions, and hardware vary by product. |
| Y-pipe | Downstream of the two exhaust branches | Combines the left and right exhaust flow paths | A test-pipe installation does not automatically require Y-pipe removal. |
| Turbo downpipe | Immediately after a turbocharger | Carries exhaust away from the turbine | Not the same part or location on a naturally aspirated 350Z. |
Tools and Parts You May Need for 350Z Test Pipe Installation
Check the instructions supplied with your selected test pipes before beginning. Hardware, gasket requirements, oxygen-sensor provisions, and flange design can differ between products.
- Penetrating lubricant for exhaust fasteners
- Ratchet and socket set
- Breaker bar for stubborn hardware
- Oxygen-sensor socket or suitable sensor tool
- Torque wrench
- Floor jack and correctly rated jack stands, or ramps
- Safety glasses and gloves
- Replacement gaskets and hardware if required by the selected product or the existing hardware condition
- Anti-seize compound, used only where appropriate for the sensor and product instructions
Never work under a vehicle supported only by a hydraulic jack. Exhaust components retain heat for a long time, and seized fasteners can change a straightforward job into a repair involving broken studs or damaged threads. If the car is heavily corroded or a fastener begins to deform, stop and reassess before applying more force.
Preparation Before Installing Test Pipes on a 350Z
Park on level ground and let the exhaust cool completely. Apply penetrating lubricant to the fasteners joining the factory catalytic converters to the upstream and downstream exhaust sections. On older vehicles, giving the lubricant time to work can make a meaningful difference.
Before disconnecting anything, inspect the existing exhaust layout. Confirm the location of the oxygen-sensor connectors, note how the harnesses are routed, and look for previous exhaust repairs, damaged flanges, or signs of leakage. Take photos of the original routing if needed so the sensor harnesses can be returned without stretching or twisting them.
Disconnecting the battery may be appropriate when working around electrical connectors, but it does not guarantee that warning lights will not return after installation. Warning-light behavior depends on the vehicle, emissions equipment, sensor readings, wiring condition, exhaust leaks, and calibration.
Step-by-Step Test Pipe Installation for a Nissan 350Z
Step 1. Safely Raise and Support the Vehicle
Use ramps or lift the vehicle with a hydraulic jack and support it with correctly placed jack stands. Leave enough working room to access the factory catalytic converters, sensor connectors, and flange hardware. Check vehicle stability before moving underneath it.

Step 2. Locate and Disconnect the Oxygen Sensors
Locate the oxygen sensors associated with the factory catalytic converters and disconnect the electrical connectors before attempting removal. Use an oxygen-sensor socket where access allows. Avoid pulling on the wiring or using the harness as leverage.
Step 3. Remove the Factory Catalytic Converters
Remove the fasteners securing the original catalytic converters to the engine-side exhaust and the downstream exhaust connection. This step removes the factory cats; it does not mean removing the Y-pipe unless a separate configuration or repair specifically requires that work.
Seized hardware is common on older 350Zs. Apply penetrating lubricant, use controlled force, and avoid rushing. If a stud breaks or a flange is badly corroded, the correct repair may require additional parts or professional help.
Step 4. Test-Fit the New 350Z Test Pipes
Position each test pipe with the correct orientation before tightening any fastener. Confirm that the flanges sit squarely, gasket surfaces are clean, oxygen-sensor bungs are accessible, and the pipes have clearance from the underbody and adjacent components.
Install new gaskets and hardware when required. Start all fasteners by hand, then tighten gradually and evenly. Follow the torque specifications in the applicable Nissan service information and the selected product instructions; do not rely on an assumed universal torque value.
Step 5. Reinstall the Oxygen Sensors
Reinstall the sensors carefully and reconnect the harnesses without tension, sharp bends, or contact with hot exhaust components. Confirm that each connector is fully seated and that the wiring follows a safe path away from moving parts and exhaust heat.
Step 6. Inspect Before Lowering the Car
Check that every fastener is secure, no gasket is pinched, and no pipe is touching the chassis, heat shield, or suspension components. Lower the vehicle, reconnect the battery if it was disconnected, and start the engine.
After Installation: What to Check
Listen for exhaust leaks, rattles, or contact noises during the first start-up. A ticking sound near a flange can indicate a leak; a metallic knock over bumps can indicate insufficient clearance or a shifted exhaust position.
- Check flange joints for soot marks after a heat cycle.
- Inspect sensor wiring again after the exhaust has warmed and cooled.
- Listen for rattles at idle and under light acceleration.
- Recheck accessible fasteners according to the selected product instructions after initial heat cycles.
- Address a warning light with proper diagnosis instead of assuming one cause.
Common 350Z Test Pipe Installation Problems
| Symptom | Possible Cause | Next Check |
|---|---|---|
| Ticking or puffing sound | Leak at a flange, gasket, or damaged sealing surface | Inspect flange alignment, hardware, and gasket condition after cooling. |
| Rattle or banging noise | Insufficient clearance or exhaust movement | Inspect pipe-to-underbody, brace, and heat-shield clearance. |
| Sensor-related warning light | Sensor readings, wiring, leaks, emissions equipment, or calibration | Read the diagnostic code and inspect the system instead of guessing. |
| Fastener will not loosen | Heat cycling and corrosion | Use controlled techniques; stop if the stud is twisting or deforming. |
Choosing a Compatible Nissan 350Z Test Pipe
Before selecting a part, confirm your exact vehicle year, engine, transmission and drivetrain where applicable, existing headers or manifolds, Y-pipe connection, and the product configuration. Two similar-looking exhaust parts are not automatically interchangeable.
If you are comparing options, review the selected product configuration and package contents before ordering. The existing product path for this topic is Flashark Nissan 350Z Test Pipes. Confirm the product-page fitment details against your specific vehicle before purchase or installation.
Final Thoughts
A 350Z test-pipe installation is primarily a fitment, access, and sealing job. The most important habits are simple: identify the correct components, support the car safely, protect the oxygen-sensor wiring, avoid mixing up catalytic converters with the Y-pipe, and inspect every connection before and after the first heat cycle.
If the vehicle has heavy corrosion, damaged exhaust hardware, uncertain fitment, or an unresolved warning light, pause before continuing. A careful inspection and the correct information are more valuable than forcing a part into place.
Frequently Asked Questions
Q1. Where do test pipes go on a Nissan 350Z?
A1. Test pipes install in the factory catalytic-converter location, between the engine-side exhaust and the downstream exhaust. They are not a replacement for the Y-pipe.
Q2. Are test pipes and downpipes the same thing on a 350Z?
A2. Not usually. On a naturally aspirated Nissan 350Z, test pipes replace the catalytic converters. A downpipe normally refers to the exhaust section immediately after a turbocharger, so the terms should not be treated as interchangeable.
Q3. Do Nissan 350Z test pipes fit every 350Z?
A3. No. Confirm the vehicle year, engine, existing exhaust configuration, flange connections, and the selected product's fitment information before ordering.
Q4. Do I need to remove the Y-pipe to install 350Z test pipes?
A4. A normal test-pipe installation removes the factory catalytic converters, not the Y-pipe. Separate exhaust layouts or repairs may require additional work, so inspect your vehicle before starting.
Q5. Will installing test pipes cause a check engine light?
A5. Warning-light behavior varies. Sensor location, exhaust leaks, wiring condition, emissions equipment, and calibration can all affect the result. Diagnose any warning light properly rather than assuming one cause.
Q6. Do test pipes require an ECU tune?
A6. Tune requirements vary by vehicle and installed hardware. A tune decision should consider the complete engine and exhaust configuration, calibration goals, emissions equipment, and diagnostic behavior.
Q7. Do test pipes add horsepower to a 350Z?
A7. Exhaust changes can alter restriction and scavenging conditions, but the final result depends on the full exhaust system, engine condition, calibration, and how the vehicle is tested. Do not assume a fixed power result without relevant test data.
Q8. Why is there a ticking sound after test-pipe installation?
A8. A ticking or puffing sound can indicate an exhaust leak at a flange, gasket, or damaged sealing surface. Let the exhaust cool, then inspect alignment, hardware, and gasket condition.
Q9. Can I reuse the factory exhaust gaskets and bolts?
A9. Reuse depends on their condition and the selected product instructions. Corroded hardware, damaged gaskets, or uneven sealing surfaces should be addressed before final assembly.
Q10. What is the hardest part of installing test pipes on a 350Z?
A10. Rusted fasteners, fragile oxygen sensors, limited access, and exhaust alignment are common challenges. The difficulty can change significantly with vehicle age, corrosion, and prior exhaust work.
Q11. How do I check for an exhaust leak after installation?
A11. Listen for ticking or puffing sounds, inspect flange areas for soot after a heat cycle, and check that fasteners and gaskets remain correctly seated after the system cools.
Q12. Are test pipes legal for road use?
A12. Requirements vary by location and vehicle use. Review local emissions and road-use requirements before modifying emissions-related equipment.

Steven Chen
Automotive Performance Specialist | Engine & Exhaust Systems
Steven focuses on practical engine performance, exhaust fitment, and real-world upgrade paths for classic and modern enthusiast vehicles. He reviews small-block Ford, LS, truck, and street/strip applications with one goal in mind: helping builders choose parts that actually work together. His philosophy: "Good power starts with the right combination, not the biggest part."














