


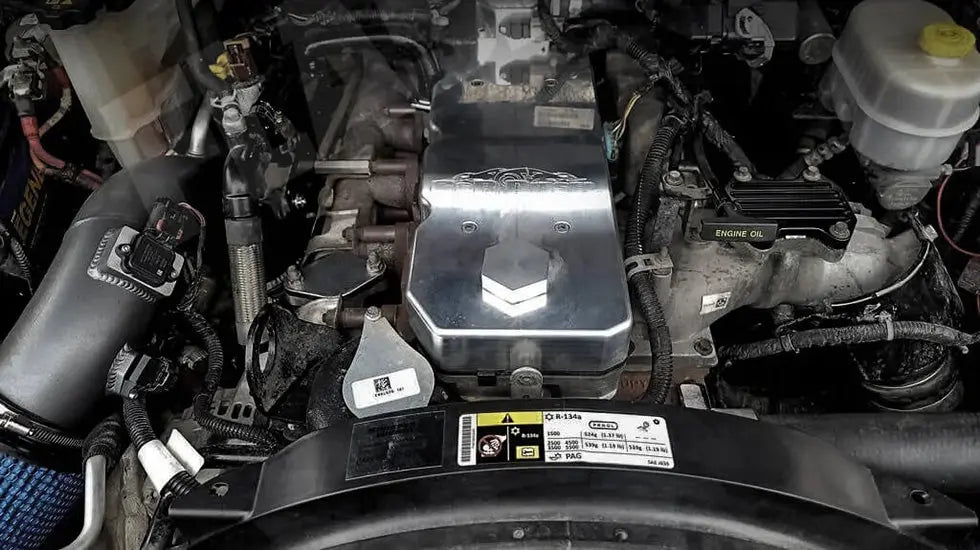
An EGR delete on a 6.7 Cummins involves more than removing one valve. The job can include the EGR crossover tube, valve, cooler, throttle-valve components, coolant connections, block-off hardware, and changes that affect the engine-control and emissions systems. The exact sequence depends on the truck, model year, installed emissions equipment, and selected kit.
This guide explains the mechanical workflow, the places where installers commonly run into trouble, and the checks that matter before the truck is started. Match every step to the instructions supplied with the selected kit and the service information for the vehicle.
- A 6.7 Cummins EGR delete can involve the valve, cooler, crossover piping, throttle-valve hardware, block-off plates, and coolant routing.
- The installation is not identical across every 6.7 Cummins application. Match the system to the vehicle year, engine, emissions equipment, and selected configuration.
- Work on a cold engine, disconnect both batteries, control the coolant, and keep dirt out of every open intake, exhaust, and coolant passage.
- Tune requirements vary by vehicle and installed hardware. Do not assume that removing hardware alone will prevent diagnostic trouble codes or drivability problems.
- Review local emissions and road-use requirements before modifying emissions-related equipment.
- No universal horsepower, torque, or fuel-economy result applies to this job.
What the EGR System Does on a 6.7 Cummins
The exhaust gas recirculation system routes a controlled amount of exhaust gas back into the intake stream to reduce nitrogen-oxide emissions. On a diesel engine, soot from the exhaust can combine with oil vapor in the intake and leave deposits in the EGR valve, cooler passages, intake elbow, and nearby components.
Removing EGR hardware stops that particular exhaust-gas path, but it does not eliminate every possible source of deposits or engine wear. It also does not guarantee a measurable increase in power or fuel economy. Those results depend on the complete vehicle configuration, engine condition, calibration, operating load, and test method.
Know Which Parts of the System You Are Working On
The terms “EGR delete,” “EGR cooler delete,” and “EGR valve delete” are often used as though they describe the same job. They do not always refer to the same set of parts. Here is the part that matters: identify what the selected configuration changes before disconnecting anything.
| Component or task | Function | Installation concern | Post-installation check |
|---|---|---|---|
| EGR valve and crossover piping | Controls and carries recirculated exhaust gas | Electrical connectors, clamps, sealing faces, and open passages | Secure connections and no exhaust leakage |
| EGR cooler | Transfers heat from recirculated exhaust gas to engine coolant | Coolant draining, hose routing, retained coolant, and open ports | Coolant level, hose security, temperature, and leaks |
| Block-off plates and gaskets | Seal passages left by removed components | Clean mating surfaces, correct gasket placement, and even tightening | No exhaust, intake, or coolant leakage at the sealed area |
| Throttle-valve hardware | Works with the intake and emissions-control strategy | Configuration-specific hardware and electrical connections | Free movement, secure plumbing, and no connector damage |
| Engine-control calibration | Controls engine operation, diagnostics, and emissions-system monitoring | Requirements vary with the vehicle and installed hardware | Scan for faults and address them through a qualified, lawful diagnostic process |
Before You Begin: Parts, Fitment, and Tools
Choose the Correct 6.7 Cummins EGR Delete Kit
Fitment matters more than a familiar-looking plate or hose. Two kits can appear similar while using different coolant connections, throttle-valve parts, brackets, or sealing hardware. Match the selected configuration to the truck before disassembly, and compare the contents with the kit instructions.
Flashark lists separate configurations for a 2013–2018 6.7L Cummins EGR plate, cooler, and throttle-valve delete kit and a 2010–2014 6.7L Cummins EGR throttle-valve and cooler delete kit. Because the listed year ranges overlap, choose by the exact vehicle and selected product configuration rather than by engine displacement alone. For other configurations, browse the EGR delete kit collection and contact customer support if help is needed to identify the correct option.

Tools and Supplies
- 8 mm, 10 mm, 14 mm, and 15 mm sockets or wrenches
- A deep socket suitable for the EGR pipe clamps
- Ratchet, extensions, and hand tools needed for access
- Drain pan and suitable containers for coolant
- Replacement coolant that meets the vehicle requirements
- Thread sealant only where the kit instructions specify it
- Hose clamps and sealing hardware supplied for the selected configuration
- Shop towels, parts-cleaning supplies, and caps for open passages
- Eye protection and gloves suitable for automotive coolant and shop work
Step-by-Step EGR Deletion Process
Step 1: Prepare the Vehicle
- Park on a level surface, allow the engine to cool completely, and secure the vehicle.
- Disconnect both batteries to reduce the risk of an electrical short while connectors and metal tools are being handled.
- Position a drain pan and drain enough coolant to open the EGR cooler circuit without uncontrolled spillage.
- Remove the plastic engine cover with an 8 mm socket. Remove only the brackets or access components identified by the vehicle and kit instructions.
- Photograph hose routing, connector positions, clamps, and bracket orientation before disassembly.

Keep coolant away from belts, electrical connectors, and open intake passages. Cap or cover every opening as soon as a hose or pipe is removed.
Step 2: Remove the EGR Valve and Related Piping
The EGR valve and cooler are located on the engine assembly and connected by exhaust, intake, coolant, and electrical interfaces. The exact appearance and access path vary with configuration, so identify the valve, crossover piping, cooler, and throttle-valve hardware before removing fasteners.
- Loosen the EGR pipe clamps with the appropriate deep socket.
- Remove the 10 mm fasteners securing the pipe, supporting the pipe as the last fastener comes out.
- Disconnect the EGR valve electrical connector without pulling on the wiring.
- Remove the 10 mm EGR valve fasteners and lift the valve away from its sealing surface.
- Remove or reposition throttle-valve components only as directed for the selected configuration.

Do not pry against a machined sealing face. If a component does not move after its visible fasteners are removed, stop and look for a hidden bracket, clamp, or connection. Forcing it can damage the housing or nearby wiring.
Step 3: Install the EGR Block-Off Plates
- Remove old gasket material without gouging the mating surface.
- Keep debris out of the intake and exhaust passages while cleaning.
- Position the supplied gaskets and block-off plates in the orientation shown by the kit instructions.
- Start every fastener by hand. Bring the plate down evenly instead of fully tightening one corner first.
- Use the tightening specification supplied for the selected hardware or the applicable service procedure.

Step 4: Remove the EGR Cooler and Route the Coolant Connections
An EGR cooler delete opens the engine-coolant circuit, so cleanliness and hose routing are critical. Coolant can remain trapped in the cooler even after the system has been drained.
- Remove the heat shields and brackets needed to expose the cooler.
- Place absorbent material and a drain pan below the coolant connections.
- Disconnect the coolant lines carefully and cap the open ports.
- Support the cooler as its fasteners are removed. Keep it level while moving it away from the engine.
- Install the supplied coolant adapter, hose, clamps, and seals in the arrangement specified for the selected configuration.
- Apply thread sealant only to connections for which it is specified. Keep sealant away from the inside of the coolant passage.

A hose should follow a natural path without a sharp bend, twist, or contact with a hot or moving component. Do not use a clamp to pull a poorly aligned hose into place.
Step 5: Reassemble, Refill, and Inspect
- Confirm that every block-off plate, coolant connection, bracket, and clamp is secure.
- Check that electrical connectors and wiring are protected from heat, abrasion, and moving parts.
- Refill the cooling system with the correct coolant and follow the applicable filling and air-bleeding procedure.
- Reconnect both batteries.
- Before starting, inspect the engine bay for tools, loose hardware, open ports, and disconnected hoses.
- Start the engine only when the installation and control-system requirements have been addressed.
- Watch the coolant level and temperature. Inspect every modified joint for coolant, intake, or exhaust leakage.
- After the engine cools, recheck the coolant level, hose position, clamps, and fasteners.

Engine-Control and Diagnostic Considerations
The engine-control module monitors emissions-related components and operating conditions. Removing hardware can produce diagnostic trouble codes, warning lights, or drivability problems when the control strategy no longer matches the installed equipment.
Tune requirements vary by vehicle and installed hardware. Do not assume that unplugging a component, leaving a connector open, or loading a generic file is an acceptable solution. Use a qualified diagnostic process, protect the original configuration information, and follow every law that applies to emissions-related calibration and road use.
Common Installation Mistakes
- Starting with the wrong configuration: Similar-looking kits can use different plates, hoses, adapters, or brackets.
- Working on a hot cooling system: Hot coolant can cause serious injury and is harder to control during disassembly.
- Letting debris enter an open passage: Cover intake, exhaust, and coolant openings immediately.
- Using sealant everywhere: Excess sealant can enter a coolant passage, while some joints are designed to seal with a gasket or formed seal.
- Tightening one corner first: A block-off plate should seat evenly against a clean mating surface.
- Routing a hose under tension: A twisted or stretched hose can move against a hot or sharp component after the engine warms up.
- Skipping the cold recheck: Coolant level and clamp seating should be inspected again after a complete heat cycle and cooldown.
- Treating a warning light as a nuisance: Read and diagnose faults rather than assuming they are harmless.
Final Check
A careful 6.7 Cummins EGR delete installation is mainly a fitment, sealing, coolant-control, and system-integration job. Identify the exact configuration before disassembly, keep every passage clean, avoid forcing parts into alignment, and inspect the cooling system twice—once during the first run and again after the engine has cooled.
The mechanical steps are only part of the decision. Emissions compliance, diagnostics, calibration, warranty, and the intended use of the truck should be considered before any factory equipment is changed.
Frequently Asked Questions About a 6.7 Cummins EGR Delete
Q1: Where is the EGR valve on a 6.7 Cummins?
A1: The EGR valve is mounted on the engine assembly and connects to the EGR piping, intake path, and an electrical connector. Its exact appearance and access path vary by configuration. Identify the valve, cooler, crossover pipe, and throttle-valve hardware before removing fasteners.
Q2: Where is the EGR cooler located on a 6.7 Cummins?
A2: The cooler is part of the EGR assembly and is connected to both the exhaust-gas path and engine coolant. Follow the coolant lines and EGR piping, then compare the layout with the instructions for the selected vehicle configuration.
Q3: Are the EGR delete instructions the same for every 6.7 Cummins?
A3: No. The engine name alone is not enough to establish fitment or an identical procedure. Vehicle year, emissions equipment, cooler and throttle-valve layout, and the selected kit can change the hardware and sequence.
Q4: Can a 6.7 Cummins EGR delete be completed without tuning?
A4: Tune requirements vary by vehicle and installed hardware. Removing or disconnecting emissions-related components can cause diagnostic faults or operating problems. Do not assume that hardware removal alone will produce normal operation.
Q5: Does an EGR delete guarantee more horsepower or torque?
A5: No. There is no universal power figure for an EGR delete. Any measured change depends on the complete vehicle configuration, engine condition, calibration, fuel, supporting hardware, and test method.
Q6: Will an EGR delete improve fuel economy?
A6: It should not be treated as a guaranteed fuel-economy modification. Fuel use changes with calibration, load, gearing, driving conditions, engine condition, and the rest of the emissions and intake system.
Q7: Does an EGR delete change the exhaust sound?
A7: EGR hardware alone does not provide a predictable sound result. Exhaust layout, after-treatment equipment, pipe size, mufflers, engine load, and calibration have a larger effect on what the driver hears.
Q8: Do I need to drain the coolant to remove the EGR cooler?
A8: Yes, the coolant must be controlled before opening the cooler circuit. Work on a cold engine, use a drain pan, cap open ports, and follow the applicable refill and air-bleeding procedure.
Q9: How do I choose between two kits with overlapping model years?
A9: Do not choose by the model-year label alone. Match the selected configuration to the vehicle year, engine, installed emissions equipment, coolant connections, throttle-valve hardware, and kit contents. Contact customer support if the configuration cannot be identified confidently.
Q10: What should I check after installing EGR block-off plates?
A10: Check that each plate sits flat, the gasket remains correctly positioned, fasteners are tightened evenly, and nearby hoses and wiring have clearance. During the first run, inspect the sealed areas for intake, exhaust, or coolant leakage.
Q11: What should I check after refilling the cooling system?
A11: Monitor coolant level and engine temperature, inspect every modified hose and adapter, and look for trapped or rubbing hoses. After the engine cools completely, recheck the coolant level, clamps, and connections.
Q12: Is an EGR delete legal for a road-driven truck?
A12: Emissions and road-use requirements vary by jurisdiction and vehicle use. Removing, blocking, or electronically disabling emissions-control equipment can be restricted. Review the rules that apply to the vehicle before making changes.

Steven Chen
Automotive Performance Specialist | Engine & Exhaust Systems
Steven focuses on practical engine performance, exhaust fitment, and real-world upgrade paths for classic and modern enthusiast vehicles. He reviews small-block Ford, LS, truck, and street/strip applications with one goal in mind: helping builders choose parts that actually work together. His philosophy: "Good power starts with the right combination, not the biggest part."











