
When you’re looking to boost the performance of your RAM 1500, one of the most effective upgrades is installing a set of High-performance exhaust headers. Headers can significantly improve exhaust flow, increase horsepower, and enhance the overall sound of your vehicle. In this detailed guide, we will walk you through everything you need to know about installing headers on your RAM 1500, including why they’re a great upgrade, the tools you’ll need, a step-by-step installation process, and how to troubleshoot common challenges. Additionally, we will highlight the benefits of two top-performing products for your vehicle.
Why Install Headers on Your RAM 1500?
Upgrading your exhaust system with headers offers several benefits. Here’s why it’s a great idea for your RAM 1500:
-
Performance Boost: Headers reduce backpressure and improve exhaust flow, allowing the engine to breathe easier. This results in more horsepower and torque, especially useful for towing, hauling, or off-roading.
-
Sound Improvement: Long tube headers create a deeper, more aggressive exhaust note, giving your truck a powerful sound that enhances both performance and style.
-
Fuel Efficiency & Tuning: By improving exhaust flow, headers help the engine run more efficiently, leading to better fuel economy. Combined with aftermarket tuners, headers can unlock extra power and further optimize fuel savings.
What You’ll Need for the Installation
Before you begin the installation of headers on your RAM 1500, make sure you have the right tools, parts, and safety equipment. This preparation ensures a smoother and more efficient installation process.
Essential Tools
To install headers, you'll need a few essential tools:
-
Wrenches and sockets (including a torque wrench)
-
Crowbar or large screwdriver
-
Jack and jack stands (or ramps)
-
Step ladder (for reaching certain components)
-
Safety glasses and gloves
Having the right tools is critical to ensure you can safely and efficiently remove the factory parts and install the new headers.
Parts and Components
Besides the headers themselves, you will also need:
-
Exhaust gaskets (ensure you use high-quality gaskets to avoid leaks)
-
Mounting hardware (often included with headers, but check before starting)
-
Heat wraps (to protect any nearby hoses or components from heat)
-
O2 sensor extensions (if necessary)
Two excellent products you can consider for your RAM 1500 are:
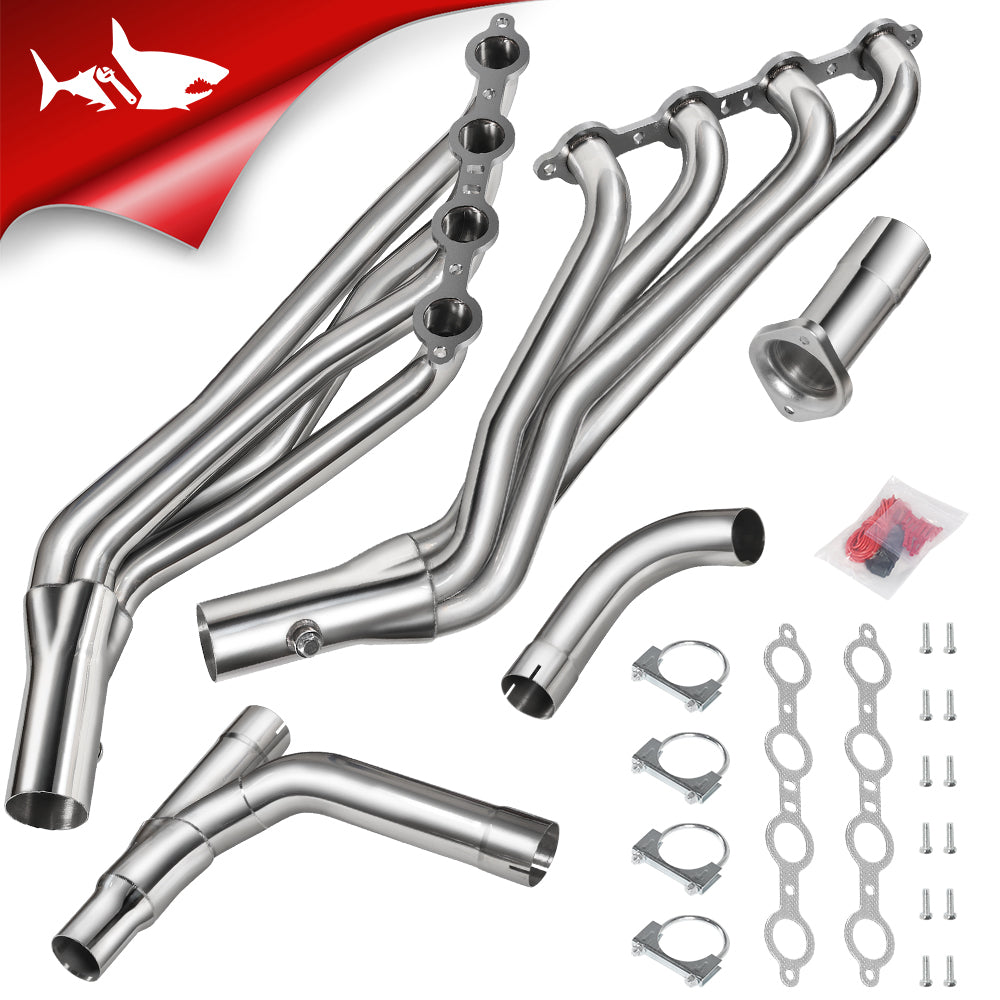
Flashark 2009-2018 Dodge RAM 1500 Short & Long Tube Headers – These are the ideal upgrade if you are looking for high-performance 2017 ram 1500 headers. Whether you opt for the long tube or short tube version, these headers are built for performance, durability, and improved exhaust flow.

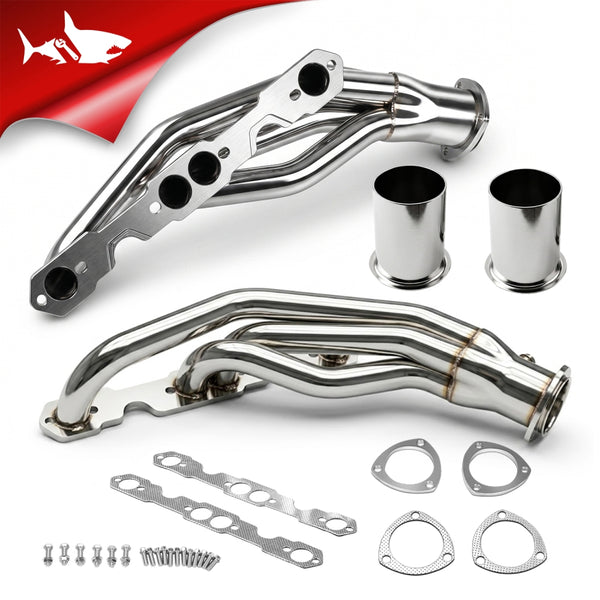
Flashark 1994-2004 Dodge Ram 1500 Exhaust Headers – Perfect for the older models, these headers improve horsepower, reduce backpressure, and provide an aggressive exhaust sound.

Safety Gear
Don’t forget to wear safety gear like gloves and protective glasses. Handling hot parts and heavy components can be hazardous, so it's important to protect yourself throughout the process.
Pre-Installation Steps: Preparing Your Ram 1500 for Header Installation
Before you begin installing headers on your Ram 1500, it’s important to properly prepare your vehicle. These initial steps ensure a smooth and safe installation process, reducing the chance of complications along the way.
Step 1: Disconnect the Battery
The first step in any modification involving the electrical system is to disconnect the battery. This prevents accidental electrical shorts and ensures your safety, especially when dealing with sensitive components like sensors or wiring.
Step 2: Remove the Factory Intake Air Box
To gain access to the header installation area, the factory intake air box and tubing must be removed. Begin by detaching the intake tube connected to the throttle body. Then, take out the air box and any associated intake components.
Step 3: Remove the Steering Shaft Bolt
Next, remove the steering shaft bolt. This step is necessary to create enough space for header installation, particularly on the driver’s side where clearance is tight. Carefully detach the shaft from the steering column, but do not remove it completely.

Step 4: Remove the Oil Dipstick Bolt
To avoid any interference during installation, remove the oil dipstick bolt. You can push the dipstick to one side without removing it entirely, just enough to clear the area where the headers will sit.
Step 5: Remove Heat Shields
Both the driver’s and passenger’s side heat shields need to be removed. These shields protect surrounding components from the intense heat produced by the exhaust system. Removing them provides better access to the header bolts and flanges.
Detailed Step-by-Step Instructions for Installing Headers
Now that your Ram 1500 is prepared, it’s time to move on to the actual installation of your new headers. Follow these steps carefully to ensure a proper and secure fit.
Step 6: Remove the Inner Fender Liner
On the passenger side, remove the inner fender liner. This provides better access to the engine bay and allows you to reach the header mounting points more easily.
Step 7: Disconnect Heater Hoses
On the passenger side, disconnect the heater hoses from their brackets. These hoses can interfere with the header installation, so you’ll need to wrap them in the supplied heat wrap and secure them with zip ties. This will protect the hoses from the added heat generated by the headers.

Step 8: Raise the Vehicle
To allow easier access to the underside of your Ram 1500, raise the vehicle using a jack. Ensure that the truck is securely supported by jack stands to keep things safe while you work underneath.
Step 9: Support the Transmission and Remove the Skid Plate (for 4WD)
For 4WD models, you’ll need to remove the skid plate. Unbolt it carefully, then use a jack to support the transmission to ensure stability during the rest of the installation.
Step 10: Remove the Transmission Crossmember
Next, unbolt and remove the transmission crossmember. This step is required to make room for the exhaust system and to give you enough space to work around the headers.

Installing the New Headers
At this point, the groundwork is complete, and it's time to install your new headers. Follow these instructions to ensure the headers are securely mounted and correctly positioned.
Step 11: Remove the Exhaust System
Begin by detaching the factory exhaust from the Y-pipe. You may need to use a crowbar or large screwdriver to carefully push back the exhaust pipe. Once it's out of the way, disconnect the O2 sensors and unbolt the Y-pipe to remove the factory exhaust system.

Step 12: Clean the Head/Manifold Surface
Before installing the new headers, it’s important to clean the head or manifold surface. Use a degreaser and a clean rag to wipe down the area. If there’s any carbon buildup, gently remove it with a small putty knife—just be sure not to scratch the surface, as that can lead to gasket leaks.
Step 13: Install the Header Gaskets
Place the header gaskets into position using electrical tape to hold them in place while you install the headers. This ensures the gaskets stay aligned during the process. Take extra care to align the gaskets correctly, as an improper fit can cause gasket blowouts.
Step 14: Install the New RAM 1500 Headers
Now it’s time to install the new RAM 1500 headers. Carefully position them in place and begin tightening the header bolts. Torque the bolts to factory specifications (around 18-20 ft-lbs) to ensure a proper seal and avoid potential leaks.

Post-Installation Checklist: Ensuring a Proper Fit
Once your headers are installed, there are a few final steps to ensure everything is properly secured and functioning. Follow this checklist to complete the job.
Step 15: Reinstall Other Components
After securing the headers, reinstall the Y-pipe, transmission crossmember, and any other components you had to remove during the process. Make sure everything is fastened securely before moving on.
Step 16: Reconnect the O2 Sensors
Reattach the O2 sensor harnesses to the factory wiring. Make sure all sensors are properly connected and secured to avoid issues with engine performance.
Step 17: Retorque Header Bolts
Once your vehicle has gone through a few heat cycles or driven several hundred miles, you must retorque the header bolts. This step is crucial to prevent gasket leaks and ensure a secure fit for long-term durability.
Step 18: Reconnect the Battery
Finally, reconnect the battery. Start the engine and listen carefully for any unusual sounds. If everything sounds normal, you’re good to go! Enjoy the enhanced performance, improved sound, and overall power boost that comes with your new headers.
Common Challenges and Troubleshooting
While installing headers on your RAM 1500 is a rewarding project, there are common challenges that may arise. Here’s how to troubleshoot:
Gasket Leaks
Leaking gaskets are one of the most common problems when installing headers. To avoid this, ensure that you’re using high-quality gaskets, and always check that they are seated properly before tightening the headers.
Exhaust Leaks and Noise Issues
If you notice a loud exhaust leak after installation, double-check all connections. Make sure the Y-pipe and header flanges are securely bolted together. Using a proper exhaust sealant may also help ensure a tight seal.
O2 Sensor and Clearance Problems
Installing headers can sometimes affect the positioning of O2 sensors. Be prepared to use O2 sensor extensions to avoid issues with the truck's ECU. Also, make sure there’s enough clearance around the headers to prevent any damage to nearby components.
Checking and Maintaining Your RAM 1500 Headers
After installation, reassemble everything in reverse order, reconnect the battery, lower the vehicle, and check that all parts are secure.
Test Drive and Listen for Issues
Start the engine and listen for any unusual sounds. Take your truck for a short drive to ensure the headers are functioning properly and the performance is as expected.
Check for Leaks
After a few hundred miles, check for exhaust leaks. If any leaks are found, retorque the header bolts or replace the gaskets to ensure a proper seal and optimal performance.
Regular Maintenance
To keep your headers in top condition, periodically check for wear, rust, or corrosion, especially if you're in an area with harsh conditions. Retorque the bolts occasionally to prevent loosening and ensure everything stays tight.
Final Thoughts on Upgrading Your RAM 1500 with Headers
Installing headers is one of the best ways to boost your RAM 1500’s performance, increase horsepower, and improve sound. By following the installation guide and performing regular checks, you’ll enjoy the enhanced performance and longevity of your vehicle’s exhaust system.