


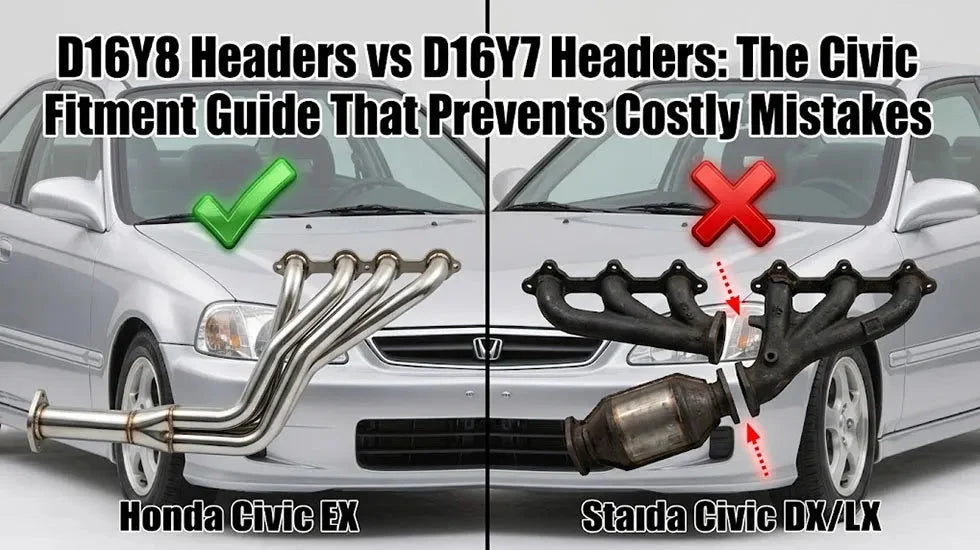
You found a polished header advertised for a “1996–2000 Honda Civic 1.6L.” The listing mentions EX, DX, LX, D16Y7, and D16Y8 in the same paragraph. The flange looks right. The price looks even better.
Then installation day arrives. The header bolts to the cylinder head, but the collector hangs several inches away from the factory exhaust. The original catalytic converter has disappeared with the old manifold. One O2 sensor wire cannot reach, the other sensor is now sitting on the wrong side of the converter, and the car is one drive cycle away from turning on the check-engine light.
That is the trap.
D16Y8 headers and D16Y7 headers are not automatically interchangeable just because both engines belong to Honda’s SOHC D-series family. The cylinder-head flange is only one part of the job. EX, DX, and LX Civics use different front-exhaust arrangements, and those differences affect the catalytic converter, O2 sensor locations, collector position, pipe length, and emissions legality.
Mechanic’s warning: Never ask only, “Will this header bolt to my engine?” Ask, “Will this header connect to my catalytic converter and the rest of my exhaust without cutting, welding, moving sensors, or deleting emissions equipment?” Those are two very different questions.
Quick Fitment Answer
- A D16Y8-style header can generally attach to a D16Y7 cylinder head, but it normally will not connect directly to a stock DX or LX exhaust system.
- A factory D16Y8 Civic EX is the straightforward application: use a header built for the Y8/EX exhaust layout and verify the collector, O2 bungs, model year, and emissions package.
- A factory D16Y7 Civic DX, LX, CX, or VP needs more planning: use a true Y7-compatible replacement or convert the front exhaust to an EX-style header, catalytic converter, and intermediate-pipe arrangement.
- The upstream O2 sensor belongs before the catalytic converter; the downstream sensor belongs after it. Having two threaded bungs does not help if both are in the wrong locations.
- EGR is usually not the deciding difference between common US-market D16Y7 and D16Y8 applications. Catalytic-converter placement and O2 monitoring are the real headaches.
- Previously swapped cars must be inspected in person. The trunk badge, VIN, cylinder head, engine block, ECU, and exhaust system may no longer match one another.
Which Civic Has a D16Y7 or D16Y8?
Start with the engine code. Not the seller’s compatibility chart. Not a forum signature from 2009. Not the EX badge somebody glued to a DX trunk lid.
On common US-market sixth-generation Civics, the D16Y7 is the economy-focused non-VTEC engine, while the D16Y8 is the higher-output SOHC VTEC engine. Both displace 1.6 liters, both are four-cylinder D-series engines, and both can look frustratingly similar when viewed through a dusty engine bay.
That is where the similarity starts causing expensive assumptions.
D16Y7 Civic Models
The D16Y7 was commonly used in 1996–2000 Civic CX, DX, LX, and VP models in the United States. Factory output is generally listed at approximately 106 horsepower.
DX and LX owners sometimes assume the different trim names mean different engine hardware. In this case, they commonly share the D16Y7 and its front-exhaust layout. The LX has more comfort equipment, but power windows do not change the exhaust-manifold flange.
The important part is that many Y7 applications use a close-coupled catalytic-converter arrangement at the front of the engine. Removing the factory manifold can also remove the original converter from the exhaust path.

D16Y8 Civic Models
The D16Y8 is most closely associated with the 1996–2000 Civic EX in the US market. It was also used in selected Del Sol Si and Canadian-market Civic applications. Factory output is commonly listed at approximately 127 horsepower.
The Y8 uses SOHC VTEC, but listen closely: VTEC is not what determines whether the collector connects to the rest of the car. The EX front pipe, separate catalytic-converter arrangement, O2 sensor positions, and intermediate-pipe connection are what matter during a header swap.
Why the Trim Badge Is Not Enough
These cars are more than two decades old. Many have lived several mechanical lives.
A Civic that left the factory as a DX may now have:
- A D16Y8 cylinder head on a D16Y7 block.
- A complete D16Y8 engine swap.
- An EX ECU and wiring conversion.
- An aftermarket header of unknown origin.
- A welded universal catalytic converter.
- An EX midpipe connected to a DX muffler section.
- An O2 sensor extension tucked behind the engine.
- A replacement engine with the original DX exhaust still underneath it.
Before ordering anything, inspect the engine stamp, under-hood emissions label, current catalytic-converter location, collector flange, and both O2 sensors. A flashlight and ten minutes under the car can save an entire weekend of fabrication.
| Application | Common Engine | Factory Output | Header Buying Concern |
|---|---|---|---|
| 1996–2000 Civic CX/DX/LX/VP | D16Y7, non-VTEC | About 106 hp | Close-coupled converter layout; do not assume an EX/Y8 header connects to the original exhaust. |
| 1996–2000 Civic EX | D16Y8, SOHC VTEC | About 127 hp | Match the Y8/EX collector, downpipe, converter, O2 bungs, and emissions package. |
| Mini-me or engine-swapped Civic | Mixed block, head, ECU, and exhaust | Depends on build | Choose by the parts currently on the car, not the original trim or VIN alone. |
Are D16Y8 Headers and D16Y7 Headers Interchangeable?
Here is the honest garage answer: sometimes at the cylinder head, usually not as a complete bolt-on exhaust system.
The exhaust-port pattern on these D-series heads allows many Y8-style headers to physically mount to a Y7 head. That is why you will find people online saying, “Yes, it fits.” They are not always lying. They are answering half the question.
The other half is underneath the car.
Cylinder-Head Fitment vs Complete Exhaust Fitment
Cylinder-head fitment answers whether the flange lines up with the exhaust ports and studs. Complete-system fitment asks whether everything behind that flange also works:
- Does the header clear the oil pan and crossmember?
- Does the collector point toward the existing exhaust?
- Is the collector flange the correct shape and bolt spacing?
- Where is the catalytic converter after the swap?
- Is the upstream O2 sensor still before the converter?
- Is the downstream O2 sensor still after the converter?
- Can both sensor wires reach without touching hot tubing?
- Does the intermediate pipe remain the correct length?
- Do the exhaust hangers line up without forcing the system sideways?
A header can pass the first test and fail every question that follows.
Why a Header Can Bolt On but Still Not Connect
The D16Y7’s stock manifold and catalytic-converter arrangement occupies a different amount of space than an EX-style Y8 header and separate converter. When you install a longer tubular header, the collector can end farther rearward. The stock Y7 front pipe may then be too short, use the wrong flange, or meet the collector at the wrong angle.
Some owners solve that with a complete EX-style front exhaust. Others have a shop fabricate a connection. Either route can work when done correctly. Neither route should be described as a five-minute direct bolt-on.

The Real Answer for EX, DX and LX Owners
- Civic EX with a confirmed D16Y8: use a header specifically designed for the Y8/EX layout.
- Civic DX or LX with a confirmed D16Y7: use a true Y7-compatible solution or budget for a front-exhaust conversion.
- DX or LX with a complete Y8 swap: inspect whether the car retained the Y7 exhaust or received the EX exhaust during the swap.
- Unknown project car: measure the collector and photograph the entire exhaust path before ordering.
Do not trust “fits all 1.6L Civics.”
A product can fit several D-series cylinder heads while still requiring different catalytic converters, downpipes, intermediate pipes, or fabrication for different chassis and trim combinations. A proper listing should state whether fitment means head-flange compatibility or complete exhaust compatibility.
D16Y7 vs D16Y8 Exhaust Layout Differences
The biggest difference is not the polished tubing. It is where Honda placed the catalytic converter and how the front section meets the rest of the exhaust.
Catalytic-Converter Placement
Many stock D16Y7 applications place the catalytic converter very close to the cylinder head as part of the front manifold assembly. This lets the converter heat quickly after startup, which is useful for emissions. It also means the converter can leave the vehicle when the original manifold is removed.
The D16Y8 EX layout uses a different arrangement with the header or manifold feeding a separate converter farther downstream. That creates room for a tubular header, but the rest of the EX exhaust is designed around that position.
Installing an EX-style header on a Y7 car without planning for the converter leaves a literal hole in the system and a legal problem on a street-driven vehicle.
Primary and Secondary O2 Sensor Locations
OBD-II Civics generally use two oxygen sensors:
- Upstream sensor: installed before the catalytic converter, where the ECU can monitor exhaust oxygen and adjust fueling.
- Downstream sensor: installed after the catalytic converter, where the ECU can compare catalyst performance.
Most Honda O2 sensor bungs in this application use the common M18 × 1.5 thread, but thread size alone is not enough. The bung must be located in the correct section of the exhaust, angled so moisture does not collect around the sensor, and positioned away from the floor, axle, fan, wiring, and road surface.
A downstream sensor installed before the converter cannot properly monitor catalyst efficiency. A sensor hanging six inches below the oil pan will eventually meet a speed bump. Neither is a clever workaround.
Collector Position, Flange and Outlet Diameter
Before buying, compare more than the number of bolt holes. Check:
- Collector flange shape.
- Bolt count and bolt spacing.
- Flange clocking and outlet angle.
- Outlet outside diameter.
- Distance from the cylinder-head flange to the collector.
- Distance from the collector to the existing intermediate pipe.
- Whether the header includes a separate downpipe.
- Whether the advertised pipe is actually a test pipe rather than a catalytic converter.
Two 2-inch outlets can still fail to connect if one points straight back and the other points toward the passenger floorboard.
The EGR Myth
EGR gets blamed for a surprising number of D-series header problems. For typical US-market D16Y7 and D16Y8 applications, however, it is usually not the feature that separates EX header fitment from DX or LX fitment.
People often mix these engines up with the lean-burn D16Y5 used in the Civic HX, which has a different emissions strategy. Market-specific engines and heavily swapped cars can also complicate the picture.
On an ordinary Y7-versus-Y8 job, start with the catalytic converter, two O2 sensors, collector, and intermediate pipe. Do not invent an EGR problem before checking the parts that are actually under the car.
| Component | Stock D16Y7 DX/LX Layout | Stock D16Y8 EX Layout | Why It Matters |
|---|---|---|---|
| Engine | D16Y7 non-VTEC | D16Y8 SOHC VTEC | Both are 1.6L engines, so displacement alone cannot determine header fitment. |
| Catalytic converter | Commonly close-coupled to the manifold | Separate downstream arrangement | Replacing the Y7 manifold can remove the original converter. |
| Upstream O2 sensor | Before the close-coupled converter | Before the separate converter | It must remain upstream of the functioning catalyst. |
| Downstream O2 sensor | Immediately after the factory converter | After the separate converter | Moving the converter may require a different bung position and longer wiring. |
| Intermediate pipe | Sized around the short manifold/converter assembly | Sized around the EX header and converter layout | Length and flange position may not match after a conversion. |
| EGR | Normally not the header-fitment divider | Normally not the header-fitment divider | Do not confuse Y7/Y8 fitment with D16Y5 HX or market-specific equipment. |
D16 Header Fitment by Civic Configuration
D16Y8 Header on a Stock Civic EX
This is the cleanest path. Confirm that the car still has its D16Y8 engine and EX-style exhaust, then match the header to the model year, chassis clearance, collector, transmission, O2 sensor layout, and emissions package.
For D16A6, D16Z6, and D16Y8 applications, the Flashark D16Y8-compatible Honda Civic exhaust header uses a stainless tubular design with a listed 1.75-inch inlet and 2.0-inch outlet. The key fitment note is just as important as the dimensions: the current product application specifically excludes D16Y7 engines.
That is how a proper recommendation should work. Match the product to the verified application instead of pretending every D-series exhaust is identical.

Flashark D16 Exhaust Header for 1988–2000 Honda Applications
Stainless steel tubular header with a mirror-polished finish, a listed 1.75-inch inlet, and a 2.0-inch outlet. Designed for specified Civic, CRX, and Del Sol D16A6, D16Z6, and D16Y8 applications.
Fitment warning: This product is not listed for D16Y7 engines. DX and LX owners should confirm the engine code and catalytic-converter layout before ordering.
$169.99 $299.99
View Fitment and Current AvailabilityD16Y8 Header on a Stock D16Y7 DX or LX
This is where the phrase “it bolts on” causes trouble.
A Y8 header may attach to the Y7 head, but the factory Y7 catalytic converter and front pipe do not magically move into the EX locations. You may need:
- An EX-style catalytic converter approved for the vehicle’s intended use.
- An EX-compatible front or intermediate pipe.
- A collector adapter or fabricated pipe.
- A new downstream O2 bung after the converter.
- An O2 sensor extension harness.
- Different gaskets, hardware, and exhaust hangers.
If you are paying a muffler shop to fabricate half of that list, add the cost before buying the cheapest header you can find. A $90 bargain can become a $500 exhaust project before the engine even starts.
D16Y7-Specific Replacement on a Stock DX or LX
A true Y7-compatible solution should explain how the factory converter and O2 sensor arrangement are retained or replaced. The listing should not simply say “fits D16Y7” and leave the converter question unanswered.
Ask the seller for a photo of the complete installed system. Not a header floating on a white background. You need to see the collector, converter, sensor bungs, and connection to the intermediate pipe.
Header Fitment on a Mini-Me Build
A mini-me build usually combines a non-VTEC D-series block with a VTEC cylinder head. That means the engine stamp may say Y7 while the head and intake side resemble a Y8 or Z6.
Do not choose the header from the block stamp alone. Check:
- The cylinder head currently installed.
- The exhaust manifold or header currently installed.
- The chassis and front crossmember.
- The catalytic-converter location.
- The ECU and OBD generation.
- The number and placement of O2 sensors.
- The intermediate pipe already on the car.
A swapped cylinder head does not automatically convert the rest of the exhaust to EX specifications.
Parts Needed for a D16Y7-to-D16Y8 Exhaust Conversion
There is no single universal shopping list because previous owners may have already changed half the system. Still, this is the list I would work through before putting the car on jack stands.
Minimum Conversion Parts
- D16Y8 or EX-style header.
- Matching downpipe or front pipe, if separate.
- Correct catalytic converter for the vehicle and jurisdiction.
- EX-style intermediate pipe or a properly fabricated connection.
- New cylinder-head-to-header gasket.
- New collector and catalytic-converter gaskets.
- Replacement studs, nuts, spring bolts, and hardware.
- Correct upstream and downstream O2 sensor bungs.
- O2 sensor extension harness when the rear sensor moves farther downstream.
- Heat protection for wiring routed near the header.
- Fresh rubber exhaust hangers.
Parts You May Be Able to Reuse
Depending on the body style and current exhaust, you may retain the resonator, rear muffler, tailpipe, original sensors, or portions of the intermediate pipe. “May” is doing real work in that sentence.
Coupe, sedan, and hatchback exhaust systems can use different lengths and hanger positions. Measure before assuming the rear half of one system will line up with the front half of another.
Measurements to Take Before Ordering
- Measure the collector outlet diameter with calipers.
- Measure collector bolt spacing from the center of each hole.
- Photograph the flange straight-on.
- Measure from the cylinder-head flange to the collector.
- Measure from the collector to the current intermediate-pipe flange.
- Record the length and inlet/outlet orientation of the catalytic converter.
- Locate both O2 sensors and measure available wire length.
- Check clearance around the oil pan, A/C bracket, radiator fan, and crossmember.
- Confirm whether the current exhaust is factory, EX-swapped, or custom welded.
Shop-floor rule: If the seller cannot provide collector dimensions and cannot explain where the catalytic converter goes, assume fabrication will be required. That assumption is safer than discovering it at 8:30 p.m. with the old manifold already on the floor.
O2 Sensor Problems After a D16 Header Swap
O2 sensor trouble is rarely dramatic during installation. The connector clicks in. The car starts. It even drives normally.
Then the monitors run.
Where the Upstream O2 Sensor Should Go
The upstream sensor needs to read exhaust before it enters the catalytic converter. Ideally, it should sample the combined exhaust stream rather than a single primary tube.
Watch for cheap headers that place the bung:
- In only one runner.
- Against the radiator fan.
- Too close to the floor or crossmember.
- At the bottom of the pipe where condensation can collect.
- Where the harness must stretch across hot tubing.
An exhaust leak before this sensor can pull outside air into the system. The sensor then reports excess oxygen, the ECU may add fuel, and the owner starts replacing sensors even though the real problem is a leaking flange.
Where the Downstream O2 Sensor Should Go
The downstream sensor belongs after the working catalytic converter. Its job is to help the ECU determine whether the catalyst is storing and processing oxygen as expected.
If both sensors see nearly identical switching activity, the ECU may set a catalyst-efficiency code such as P0420. That can happen because of a worn converter, missing converter, exhaust leak, incorrect sensor placement, damaged wiring, or a poor-quality replacement catalyst.
Why the O2 Sensor Wire May Be Too Short
Moving from the close-coupled Y7 converter to an EX-style downstream converter can shift the rear sensor several inches farther back. The original harness may no longer reach without tension.
Use a purpose-built extension harness when one is available. Avoid twisting wires together beside the header and covering the repair with hardware-store electrical tape. O2 sensor circuits operate in a hot, wet, vibrating environment. A bad splice can create intermittent heater and signal faults that are miserable to diagnose.

Common Check-Engine-Light Causes
- Leak at the cylinder-head flange.
- Leak at the collector gasket.
- Cracked weld near an O2 bung.
- Upstream sensor installed too far downstream.
- Downstream sensor installed before the converter.
- Sensor wires stretched, melted, or crossed.
- Missing or ineffective catalytic converter.
- Wrong converter application.
- Damaged O2 sensor heater circuit.
- Existing fuel-control problem revealed after the exhaust repair.
Why an O2 Spacer Is Not a Fitment Repair
An O2 spacer does not align a collector. It does not replace a catalytic converter. It does not seal a warped flange, repair damaged wiring, or make a noncompliant exhaust legal.
Many beginners see a catalyst code and immediately install a spacer. That is backwards. Diagnose the converter, sensor data, exhaust leaks, and wiring first. Hiding a code is not the same as fixing the system.
Collector and Midpipe Compatibility
A header’s collector is where internet fitment charts meet actual metal. This is also where vague product descriptions fall apart.
Do Not Judge Fitment by Engine Code Alone
A useful product listing should state:
- Supported engine codes.
- Supported model years and trims.
- Whether the header is short-tube, long-tube, 4-1, or 4-2-1.
- Collector diameter and flange type.
- Whether a downpipe is included.
- Number and location of O2 sensor bungs.
- Catalytic-converter compatibility.
- Whether installation requires an EX-style exhaust conversion.
If the listing only says “D-series 1.6L,” keep scrolling.
Two-Bolt, Three-Bolt and Slip-Fit Connections
Do not assume every D-series header uses the same collector. Aftermarket parts can use two-bolt flanges, three-bolt flanges, ball-and-socket joints, flat-gasket joints, or slip connections.
Even when the bolt count matches, the flange can still differ in:
- Bolt-circle diameter.
- Gasket shape.
- Outlet diameter.
- Flange thickness.
- Clocking.
- Exit angle.
Why the Exhaust May Be Too Short
Imagine replacing a compact manifold-and-converter assembly with a long 4-2-1 header. The new collector now occupies space that used to belong to the converter or front pipe. Install a separate converter behind it, and the total front-section length changes again.
If the original intermediate pipe was designed to begin farther forward, it may no longer reach. If you substitute an EX intermediate pipe without checking body style, the rear flange or hangers may move somewhere else.
Do not pull the entire exhaust forward with a ratchet strap and force the bolts through. That preloads the header, tears hangers, opens flange leaks, and encourages weld cracks.
4-2-1 vs 4-1 Headers for D16Y7 and D16Y8 Civics
Once fitment is settled, then you can talk about runner design. Not before.

How a 4-2-1 Header Changes the Powerband
A 4-2-1 design merges four primary tubes into two secondary tubes before combining them into one collector. On a stock or lightly modified D16, that layout usually targets a broader midrange rather than chasing one narrow peak at the top of the tachometer.
That makes sense for:
- Daily-driven Civics.
- Street autocross builds.
- Mostly stock D16Y8 engines.
- Cars using a moderate exhaust diameter.
- Drivers who spend more time at 3,000–6,000 rpm than at the limiter.
How a 4-1 Header Changes the Powerband
A 4-1 header merges all four primary tubes at one collector. A properly designed version can favor high-rpm scavenging, especially when paired with a camshaft, cylinder-head work, higher compression, intake improvements, and tuning.
The phrase “properly designed” matters. Four tubes welded into a shiny collector do not automatically create top-end power. Primary diameter, primary length, merge angle, collector length, and the rest of the exhaust determine whether the design works.
Which Design Makes Sense on a Stock D16?
For an ordinary street D16, I generally prioritize correct fitment, a flat flange, sensible tubing diameter, O2 sensor placement, ground clearance, and a leak-free collector ahead of the 4-1-versus-4-2-1 argument.
A well-fitted 4-2-1 is usually the easier street choice. An oversized, low-hanging 4-1 can make less usable power below 5,000 rpm and spend its life scraping pavement.
| Parameter | Factory Manifold | Matched Aftermarket Header |
|---|---|---|
| Construction | Compact cast or factory tubular design, depending on application | Individual tubular runners with merged collector |
| Primary goal | Emissions, packaging, durability, quiet operation, and cost | Improved scavenging, reduced restriction, sound, and powerband tuning |
| Typical stock-engine gain | Baseline | Plan around approximately 3–7 whp when properly matched; poor combinations may gain little or nothing |
| Sound | Quieter and more muted | Sharper exhaust note with more mechanical tone; rasp depends on converter, resonator, and pipe diameter |
| Installation risk | Low when replacing with the correct factory part | Collector mismatch, leaks, O2 wiring problems, catalyst relocation, and reduced ground clearance |
| Best use | Stock restoration and emissions-sensitive applications | Street or track build where the complete exhaust is planned as a system |
How Much Power Can a D16 Header Add?
Here is where marketing usually gets loud and the dyno sheet quietly disappears.
A healthy stock D16Y8 does not gain 20 wheel horsepower from a header alone. There simply is not that much trapped power in the factory manifold on an otherwise stock 127-hp engine.
Realistic Header Gains on a Stock D16
For planning purposes, a properly matched header on a healthy naturally aspirated D16 commonly lands around 3–7 additional wheel horsepower. A coordinated intake, header, catalytic converter, exhaust, and tune may produce a stronger result, but the combination gets the credit—not one shiny part.
Use lower expectations when the car has:
- Low compression.
- Incorrect ignition timing.
- A clogged converter.
- A tiny crushed midpipe.
- A leaking collector.
- An oversized exhaust that kills useful gas velocity.
- No calibration for more substantial engine modifications.
For a deeper breakdown of the variables behind the numbers, read the guide to realistic D16Y8 header horsepower gains.
What You May Feel Before You See a Big Number
A good street header may improve:
- Throttle response above the midrange.
- Pull from approximately 4,000 rpm to redline.
- VTEC transition feel on a healthy D16Y8.
- Exhaust tone under load.
- Heat and weight compared with a bulky damaged manifold assembly.
That does not mean every car gains the same amount. A cracked factory manifold that leaks badly can make the replacement feel dramatic because you are restoring lost performance as well as changing the runner design.
When the Header Produces Zero Gain
I have seen enough bad combinations on paper to know the pattern: huge primary tubes, a leaking collector, no functioning converter, an abrupt adapter into a tiny factory pipe, and an owner wondering why the car feels soft below 5,000 rpm.
Flow is not simply “bigger pipe equals more horsepower.” Exhaust pulses need velocity and timing. The right combination beats the largest part.
D16 Header Installation and Pre-Start Checklist
Replacing a header on a twenty-five-year-old Civic is not technically complicated. The age of the fasteners is what turns it into a fight.
Before Removing the Factory Manifold
- Let the engine cool completely.
- Disconnect the negative battery terminal.
- Spray the manifold nuts, collector bolts, and O2 sensors with penetrating oil.
- Confirm that the replacement header actually matches the collector and converter plan.
- Have new gaskets and spare hardware ready.
- Label the upstream and downstream O2 sensor connectors.
- Support the exhaust before disconnecting the front section.
- Check whether local rules allow the planned converter arrangement.
If the current manifold is ticking, blackened around a crack, or leaking at the flange, review how to diagnose a cracked D16 exhaust manifold before ordering parts. A flange leak, cracked manifold, and failed converter can create similar noises but require different repairs.
Removing the Original Manifold
Do not put a four-foot breaker bar on a rusty exhaust stud and lean on it like you are tightening lug nuts on a dump truck. That is how a simple header job becomes a cylinder-head extraction.
- Disconnect the O2 sensors by the electrical connectors.
- Remove the heat shields where equipped.
- Support and disconnect the collector or front pipe.
- Remove brackets securing the manifold or downpipe to the engine.
- Loosen the cylinder-head nuts gradually.
- Inspect every stud for damaged threads or corrosion.
- Clean the cylinder-head gasket surface without gouging the aluminum.
Installing the New Header
Loosely assemble the entire front exhaust before final tightening. This lets the collector, converter, intermediate pipe, and hangers find their natural positions.
A commonly used D-series exhaust-manifold nut specification is approximately 23 lb-ft, or 31 N·m, but verify the service information for the exact chassis and fastener. Tighten from the center outward in steps. Do not use the nuts to drag a warped flange flat against the cylinder head.
Before the first start, confirm:
- No primary tube touches the oil pan, A/C bracket, fan, wiring, or crossmember.
- The collector is not carrying the weight of the entire exhaust.
- Both O2 sensors are installed in the correct positions.
- O2 wiring has slack and heat protection.
- The converter is present and correctly oriented.
- Every flange has the correct new gasket.
- The exhaust hangs naturally without being pulled forward or sideways.
First Start and Leak Inspection
Start the engine and listen before revving it. A sharp tick that follows rpm usually points toward a flange or collector leak. Feel around the joint without touching the hot pipe, or use soapy water during a cold-start inspection.
After the first full heat cycle, allow the engine to cool and recheck accessible hardware. Stainless tubing expands more than the cast parts it replaced, and a connection that looked tight on the stand can settle after heating.
Composite Garage Case: The Header Fit but the Exhaust Did Not
This is a composite of the same fitment failure that appears repeatedly on older D-series builds.
A 1998 Civic LX arrives with a stock D16Y7 and a 4-2-1 header sold as fitting “D16Y7/D16Y8.” The owner has already confirmed that the cylinder-head holes line up, so he assumes the difficult part is over.
My first check in that situation is not the head flange. I look underneath. The original close-coupled converter was part of the manifold assembly that has just been removed. The new collector ends roughly several inches behind the point where the LX front exhaust expects a connection. The downstream O2 sensor also has no correct post-converter location.
The proper repair is not to stretch the exhaust forward or bolt in an empty pipe. The system needs a correctly sized converter, a downstream O2 bung after that converter, and either an EX-style intermediate section or a fabricated connection that preserves clearance and does not preload the header.
The lesson is simple: the header did fit the engine, but the product did not provide a complete bolt-on solution for the car.
Emissions, Catalytic Converters and Street Legality
A 1996–2000 Civic is old. It is not automatically exempt from emissions laws.
For a street-driven vehicle in the United States, removing, bypassing, or defeating required emissions equipment can create federal and state compliance problems. Inspection procedures vary by state, but the absence of a local tailpipe test does not turn a converter-delete pipe into a legal repair.
Federal Emissions Considerations
The safe approach is to retain the required catalytic converter and OBD monitoring functions. That means:
- A correct converter remains in the exhaust path.
- The upstream sensor remains before the converter.
- The downstream sensor remains after it.
- No device is used simply to hide catalyst or O2 faults.
- The modified system does not create exhaust leaks or disable monitoring.
California and CARB Requirements
California is stricter. An emissions-related aftermarket part may require a valid CARB Executive Order covering the exact vehicle, engine, and model year. Aftermarket catalytic converters must also be approved for the specific application.
Do not assume a header is California legal because it:
- Has two O2 sensor bungs.
- Includes a catalytic converter.
- Uses stainless steel.
- Does not immediately trigger a CEL.
- Passed a visual inspection on somebody else’s car.
Look for the actual EO number and verify that it covers your engine and chassis. “For off-road use” and “50-state legal” do not mean the same thing.
Why EGR Usually Is Not the Main Issue
For common D16Y7 DX/LX and D16Y8 EX applications, the usual emissions problems are converter removal, incorrect converter application, O2 sensor relocation, exhaust leaks, and mismatched engine or ECU equipment.
If you have an HX, a D16Y5, a non-US-market engine, or a heavily modified swap, inspect its EGR and emissions hardware separately. Do not apply a generic Y7/Y8 answer to a different engine package.
Common D16 Header Buying Mistakes
Buying by “1.6L Civic” Only
Honda sold several 1.6-liter engines across different years and trims. Shared displacement does not guarantee shared exhaust routing.
Believing “Fits D16Y7 and D16Y8” Without an Explanation
The listing should explain what “fits” means. Cylinder-head flange only? Complete bolt-on? EX conversion required? Original converter retained? Welding needed?
Without those answers, the fitment claim is unfinished.
Assuming DX and EX Exhausts Are the Same
DX and EX are not just upholstery packages. On the sixth-generation Civic, they commonly correspond to different engines and front-exhaust layouts.
Deleting the Catalytic Converter by Accident
Some Y7 owners do not realize their converter is part of the assembly they are removing. They install the header, see an open collector, and only then begin searching for a converter.
Ignoring the Downstream O2 Sensor
The engine may run with the downstream sensor disconnected, but the ECU will not be happy. Plan the sensor location before welding the final pipe.
Choosing the Largest Header Available
A stock D16 does not need enormous primaries and a huge collector. Oversized tubing can soften low-rpm response, complicate the midpipe connection, and reduce ground clearance without delivering meaningful power.
Reusing Old Gaskets
A crushed twenty-year-old gasket is not a money-saving device. It is a future exhaust leak already shaped like a gasket.
Using Exhaust Bolts to Pull Misaligned Pipes Together
If the flange needs several inches of force to align, something is wrong. Correct the pipe length and angle. Do not use the header as a structural tension member.
How to Choose the Right D16Y7 or D16Y8 Header
Before comparing finishes or horsepower claims, write down the facts about the car.
Confirm These Details Before Ordering
- Model year.
- Civic trim.
- Coupe, sedan, or hatchback body.
- Engine block code.
- Cylinder head currently installed.
- Automatic or manual transmission.
- Federal or California emissions package.
- Current catalytic-converter position.
- Upstream and downstream O2 sensor positions.
- Collector flange and outlet diameter.
- Existing exhaust modifications.
- Street, race, or off-road use.
What a Good Product Listing Should Tell You
A good listing gives you dimensions, photographs, included hardware, supported engine codes, collector details, and a clear emissions statement. It also tells you what the part does not fit.
That final point builds trust. A seller who excludes the wrong application is more useful than one who claims the part fits every Honda built between 1988 and 2000.
Where to Compare Other Header Applications
Drivers working across several platforms can compare the broader range of performance exhaust headers. For brand-level browsing, the Honda exhaust headers collection separates Honda applications from unrelated engine families.
For Civic-specific fitment, start with the available Honda Civic headers, then verify the engine code and complete exhaust layout on the individual product page.
Owners still deciding between designs, model generations, and engine families should also read the guide on how to choose the right Honda Civic header.
Final Verdict: Which Header Should You Buy?
For a factory D16Y8 Civic EX, buy a header designed around the Y8/EX exhaust layout. Confirm the collector, converter, O2 sensor bungs, model year, and emissions package. That is the straightforward route.
For a factory D16Y7 Civic DX, LX, CX, or VP, do not buy an EX/Y8 header merely because the flange can attach to the head. Either choose a verified Y7-specific replacement or treat the job as a complete EX-style front-exhaust conversion.
For a mini-me or engine-swapped car, ignore the trunk badge. Inspect the current head, block, ECU, converter, O2 sensors, collector, and intermediate pipe. Build around the parts actually installed.
And here is the sentence worth remembering:
A header that bolts to the cylinder head can still be the wrong header for the car.
Frequently Asked Questions About D16Y8 and D16Y7 Headers
Q1: Will D16Y8 headers fit a D16Y7 engine?
A1: A D16Y8-style header can generally attach to the D16Y7 cylinder head, but it is not normally a complete bolt-on replacement for the stock DX or LX exhaust. The catalytic converter, collector location, O2 sensors, and intermediate pipe must also be addressed.
Q2: Can I install a Civic EX header on a DX or LX?
A2: You can use an EX-style header as part of a conversion, but it may require an EX-style catalytic converter, intermediate pipe, O2 sensor relocation, or fabrication. Do not expect every EX header to connect directly to a stock DX or LX exhaust.
Q3: Are the D16Y7 and D16Y8 exhaust-manifold bolt patterns the same?
A3: The cylinder-head flange patterns are compatible enough for many Y8-style headers to mount to a Y7 head. That does not make the collector, catalytic converter, or remaining exhaust system interchangeable.
Q4: Why does my D16Y8 header not connect to my D16Y7 exhaust?
A4: The Y7 and Y8 use different front-exhaust and catalytic-converter arrangements. The header collector may end at a different position, use a different flange, or require a separate converter and matching intermediate pipe.
Q5: Do I need an EX catalytic converter with a D16Y8 header?
A5: A Y7-to-Y8-style conversion commonly needs a separate converter positioned behind the header. The exact converter must match the pipe dimensions, sensor arrangement, vehicle application, and local emissions requirements.
Q6: Where does the second O2 sensor go after a header swap?
A6: The downstream O2 sensor belongs after the functioning catalytic converter. Installing it before the converter prevents the ECU from properly monitoring catalyst performance.
Q7: Do I need to extend the O2 sensor wiring?
A7: You may need an extension if the downstream sensor moves farther back during an EX-style exhaust conversion. Use a proper heat-resistant extension harness rather than stretching the original wires across the header.
Q8: Will a D16Y8 header cause a check-engine light on a D16Y7?
A8: It can if the conversion changes the converter or O2 sensor positions, creates an exhaust leak, damages the wiring, or removes required emissions equipment. Correct mechanical fitment and sensor placement should be solved before clearing codes.
Q9: Can a header cause a P0420 code?
A9: A header alone does not automatically cause P0420, but an ineffective or missing converter, incorrect rear-sensor placement, exhaust leaks, or damaged O2 wiring after installation can trigger the code.
Q10: Do the D16Y7 and D16Y8 use EGR?
A10: On typical US-market D16Y7 and D16Y8 Civics, EGR is usually not the feature that determines header compatibility. Do not confuse these engines with the D16Y5 Civic HX or market-specific configurations.
Q11: Is a 4-2-1 or 4-1 header better for a stock D16Y8?
A11: A well-designed 4-2-1 header usually makes more sense for a street-driven stock or lightly modified D16 because it targets a broader midrange. A 4-1 design is generally more focused on high-rpm performance.
Q12: How much horsepower do D16Y8 headers add?
A12: A realistic planning range for a properly matched header on a healthy stock or lightly modified D16 is approximately 3–7 wheel horsepower. The result depends on runner design, converter, exhaust diameter, engine condition, supporting modifications, and tuning.
Q13: Can I keep the stock D16Y7 catalytic converter?
A13: Only if the replacement header or manifold is specifically designed to work with the Y7 converter layout. An EX-style long header commonly replaces the space occupied by the original close-coupled assembly and requires a different converter plan.
Q14: Are D16Y8 headers legal in California?
A14: Legality depends on the exact header, model year, engine, and emissions application. A California street application may require a valid CARB Executive Order, and any replacement catalytic converter must be approved for the vehicle.
Q15: Will a D16Y8 header fit a D16Y7 mini-me build?
A15: It may fit the cylinder head, but complete fitment depends on the chassis exhaust, converter, collector, ECU, and O2 sensor layout. Choose parts from the vehicle’s current configuration rather than the block code alone.
Q16: Do I need a tune after installing a header on a D16Y8?
A16: A basic header on an otherwise stock D16Y8 does not always require a tune for normal operation. Tuning becomes more useful when the header is combined with a camshaft, intake, larger exhaust, higher compression, injector changes, or other airflow modifications.

Steven Chen
Automotive Performance Specialist | Engine & Exhaust Systems
Steven focuses on practical engine performance, exhaust fitment, and real-world upgrade paths for classic and modern enthusiast vehicles. He reviews small-block Ford, LS, truck, and street/strip applications with one goal in mind: helping builders choose parts that actually work together. His philosophy: "Good power starts with the right combination, not the biggest part."











